Network Configuration
In general, the system runs in one of two modes. Either it is operating as an irrigation controller or it is waiting for a network configuration so that it can start operating as an irrigation controller. When a valid network has been configured the system will automatically start operating as a controller and use of the web interface will be available.
The network configuration mode is used to initialize controllers as well as any connected radios used for communication or remote sensor and valve control. Both wireless and hardwired Ethernet connectivity is supported for Irricloud system configurations as well as LTE cellular connections.
Creating an Account and Generating a System Identifier
Before configuring a system for the first time it is necessary to establish an account at https://irricloud.com and get a System Identifier.
To create an account go to https://irricloud.com and click the Sign Up button. (If you already have an account, click Sign In and you will get a login screen.):

This will bring you to a registration page where you create a username (valid email account), create a password (at least 8 characters) and type it in twice. Then read the Terms of Service, check the Accept box and click Register to establish the account.

Once the account has been established an email will be sent from notifications@irricloud.com to your email address with a link to validate your account. Click on the link and your account will be marked and verified and you will be brought to a login page. This account verification step ensures that you actually have access to the email account you specified; you will not be able to log in or acquire a System Identifier until you have validated your account. If you do not already have a System Identifier, you can acquire one by clicking Register System near the top of the page.
To acquire a System Identifier enter a name for your system and click Request.

You will get back a string with 3 blocks of 5 characters separated by dashes. This value should be written down so you can input it to the device configuration page described below.
Configuring System Type
When the Irricloudn device is powered on and waiting for a network configuration it will broadcast a wireless signal on SSID: IrricloudAP. This can take a full minute or more, so please be patient. Use your phone or nearby computer to connect to the IrricloudAP network. It is an unsecured access point with no password.
Once connected to IrricloudAP access point, go to http://10.0.0.1/ and you will come to an initial configuration screen similar to the following:
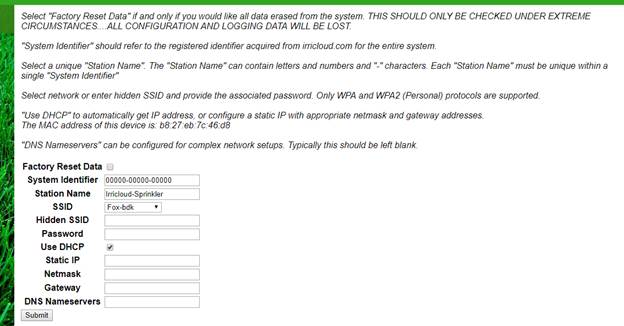
The Factor Reset Data box will cause the prior configuration and watering data to be destroyed. DO NOT check this box unless you want to revert to factory installed state, including the loss of your System Identifier
System Identifier is a unique 15 character string (separated by dashes) will be shared by all of the controllers comprising the broader system and allows management through the https://irricloud.com website. New controllers come up with 00000-00000-00000 in this box, but if you move the controller to a different network and need to reconfigure it, then the old System Identifier will be retained. All controllers in a system must have the same System Identifier to communicate. An Irricloud System Identifier can be acquired by logging in to https://irricloud.com and clicking Register System.
Station Name must be a unique name for each controller that is part of a multi-controller system. The user interface when accessing a given system will provide a list of available controllers in the upper right allowing you to easily access any station by its unique Station Name.
Connecting a system to the Network
Any wireless networks that are visible will be in the SSID list and they are ordered based on decreasing signal strength. Presumably selecting the first entry from the SSID list will be your best choice. Only networks using WPA and WPA-2 Personal encryption schemes are supported. You can select the network of choice, or you can enter your own network name in the Hidden SSID field. Enter your appropriate password to allow you to connect to that network.

Most connections to an access point (WAP) will use DHCP to get a local IP address. If this is the case, keep the Use DHCP box checked and click Submit. Your network connection to IrricloudAP should drop and after about one minute your device will now be connected to your selected wireless access point and your system can be managed through https://irricloud.com.
If you want to define a fixed IP address for your device, you can uncheck the Use DHCP box, and enter the IP address you want to use, a corresponding Netmask and Gateway. Click Submit and you should be connected.
If there is trouble getting connected, the system will bring you back to the Network Configuration mode and start broadcasting the IrricloudAP SSID again.
Some systems have the added feature of a station being able to extend your wifi range so that another station can reach the internet through this extended wifi. In other words, the station presents itself as a wifi access point for other Irricloud stations. If this feature is enabled, the fields Extended SSID and Extended Password may be filled in define the SSID and password that other stations can use to connect.
If an Irricloud cellular dongle is plugged into the headnodes USB port, then the cellular network will be used and no configuration for the internet is required.
After clicking Submit the station will reboot and you should be able to log in at https://irricloud.com and see your controllers.
Radio Configuration
If you have RF Radios as part of your Irricloud system configuration (and connected to the USB port of the Irricloud system), the basic configuration pages described above are slightly modified and include radio parameters.
The Radio Only Substation box is checked if and only if this radio is being used for remote sensing (sensors off the radio) or remote valve control. In this scenario, the radio is a standalone subcomponent of an Irricloud station. These standalone radios require a unique Radio Only Substation Name which is used to identify and control the sensors and valves connected to the radio. For radios connected to a standard station to facilitate remote communication where wifi is unavailable, then Radio Only Substation should NOT be checked.
Radio Power is a value between 0 and 4 inclusive which describes how strongly the radio will transmit its outgoing messages. There is a factor of 1000 in terms of how much power is used at 0 vs 4. For distances of less than mile 3 will usually suffice. A value of 4 is close to 27db, 3 is 24db, 2 is 18db. Radios should never be closer than 2m and the higher the power, the further apart they must be.
Radio Network Name is a unique name used by all radios that are communicating on a subnet. Radios that are part of different Radio Network Names will not be able to link and communicate with each other. There is no checking that you have typed these names correctly, so please be careful. Radio transmissions are encrypted based on the Radio Network Name as well.
Radio Router Number should generally be left as 0. Sometimes it is necessary to have an intermediate radio between the substation and a far away remote radio. That intermediate radio is called a router and every router radio on a single Radio Network Name must have a unique router number between 1 and 63. Again, there is no check to ensure uniqueness and one can create a pretty broken network pretty quickly if careful attention is not paid during configuration.
When configuring radio only substations the radio must be hooked up to a valid Irricloud system for configuration and once the radio is configured a Successful Configuration page will show prior to returning to do more Radio Only Substation configuration or finish configuring the Irricloud system.